TOPIC DETAILS

  Team Member Role(s) Profile
Fazal Ali Fazal Ali Section Editor
Jeevan Jeevan Chandrasenan Segment Author

Section editor: Mr Fazal Ali

Segment author: Mr Jeevan Chandrasenan

Document history:

Essential General Questions

  • Occupation, sport, lifestyle
  • Mechanism of injury
  • Duration of symptoms 
  • Past treatment
  • Degree of disability

Pain

  • Site 
  • Aggravating factors (i.e. stairs, hills)
  • Ability to weight-bear?
  • Progressive? (i.e.degenerative changes)
  • Nocturnal (i.e. tumour or infection)
  • Walking distance 

Swelling

Effusion

  • Diffuse 
  • Focal (i.e. lateral meniscal cyst) 

Haemarthrosis

  • ACL rupture
  • Ostochondral fracture
  • Peripheral meniscal tear
  • Patella dislocation

Locking

True locking- loss of terminal extension due to intra-articular block (i.e. displaced meniscus, loose body)

Pseudolocking-no movement in knee usually due to acute pain.

Instability/Giving way

ACL deficiencycan lead to giving way with twisting on a planted foot however patient can still run in a straight line.

Medial instabilitycan lead to difficulty with cutting activities.

Combined injuries (i.e. PLC or PMC)can lead to rotatory instability especially when walking downstairs.

Inspection

General

Patients should be undressed from waist down

Any walking aids, splints, orthotics?

Look at hands (? Rheumatoid)

Standing

Remember to inspect from all sides (front, laterally, and from behind): 

Skin 

  • surgical or traumatic scars, 
  • erythema
  • bruising
  • sinuses
  • ulcers

 Deformity 

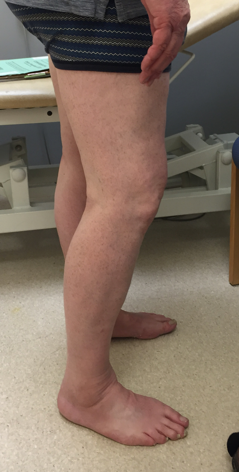
  • Varus (fig1)/ valgus 
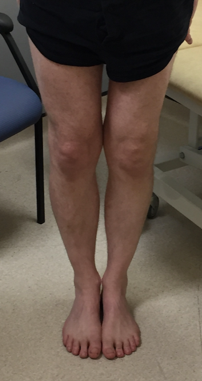
  • Fixed flexion (fig 2)
  • Hyperextension (recurvatum)
  • Limb length discrepancy - characterized by a pelvic tilt

Swelling 

  • Effusion/Bakers cyst
  • Soft tissue 

Muscle wasting (quadriceps)

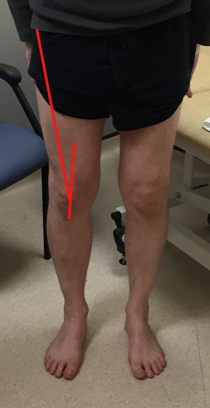
Coronal plane alignment (fig 3)

  • Patella position
  • Q angle : angle subtended from a line drawn from ASIS to midpoint of patella and line drawn from midpoint of patella to tibial tubercle, average 15°, greater in females). (fig 4)
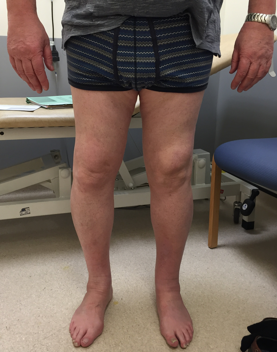
Clinical knee 1.png

Figure 1.Clinical photograph demonstrating right  knee varus deformity. Left knee demonstrates a midline surgical scar consistent with previous total knee arthroplasty. 
 Clinical knee 2.png

Figure 2 .Clinical photograph demonstrating flexion deformity of right knee. 
Clinical knee 3.png

Figure 3.Coronal plane alignment assessment with the patient’s feet pointing forwards and together. 
Clinical knee 4.png

Figure 4.Q angle assessment denoted by red lines. 

Patient walking

Observe the gait pattern

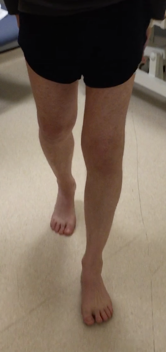
  • Foot progression angle (10-15° external)
  • Stiff knee
  • Antalgic

Varus or valgus thrust

Clinical knee 5.png

Figure 5.Clinical photograph demonstrating normal foot progression.

Patient sitting down

Legs hanging over side of couch and ask patient to extend and flex knees 

  • Patellar height
  • Feel for crepitus
  • Look for J-sign (patella moves centrally then subluxes laterally as the knee comes into extension)
Clinical knee 6.png
 
Clinical knee 7.png

Figure 6 and 7.Clinical photograph demonstrating patella tracking. 

Patient lying supine

Ensure patient is relaxed and monitor for discomfort when palpating.

  • Feel for temperature 
  • Effusion
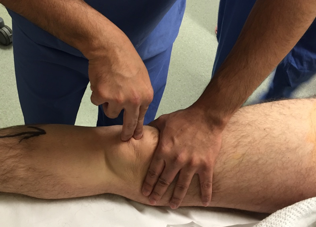
    • Swipe/bulge test (small) 
    • Patellar tap test (moderate) 
    • Ballotment test (massive)
  • Swelling
    • Cyst

Synovial hypertrophy (no effusion)

Clinical knee 8.png

Figure 8.Clinical photograph demonstrating swipe test. 


Clinical knee 9.png

Figure 9.Clinical photograph demonstrating patellar tap test 

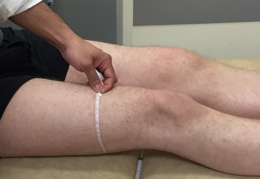
Muscle wasting(measuring the circumference of the thigh from a fixed point such as the anterior superior iliac spine) (fig 10)

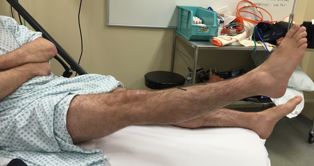
  • Straight leg raise- (‘keeping your knee straight can you lift the heel off the bed’) (fig 11)
    • Tests extensor mechanism
    • ? hyperextension
    • Assess flexion deformity, ? passively correctable
  • Flex knee assessing range of flexion (‘bend your knee’)
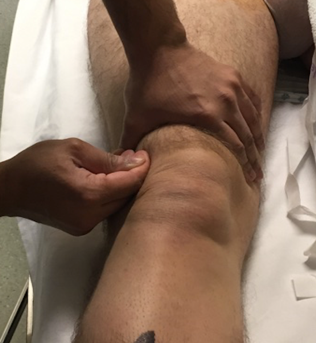
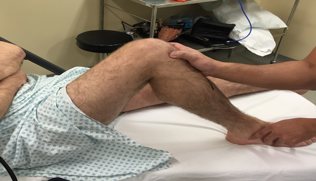
  • Palpation (fig 12)with knee at 90° and foot plantigrade on couch. 
    • Medial/lateral joint line
    • MCL/LCL attachments on femoral and tibial condyles
    • Patellar tendon

Popliteal fossa

Clinical knee 10.png

Figure 10.Clinical photograph measuring thigh circumference 
Clinical knee 11.png

Figure 11.Clinical photograph demonstrating straight leg raise 
Clinical knee 12.png

Figure 12.Clinical photograph demonstrating palpation of lateral joint line with 1 finger. 

Assess for PCL injury and posterior sag (Fig 13) first as if not recognized, then anterior movement from an abnormally posterior placed tibia may be misinterpreted as anterior instability.

  • PCL
    • Assess levels of tibial tubercles/ posterior sag
    • Medial step off of tibial plateau or lack of it
    • Quadriceps active test (Fig 14) 
  • Anterior/posterior drawer tests (Fig 15)
  • Slocum test is repeating the anterior drawer with foot in external rotation to test the posteromedial capsule.

Clinical knee 13.png

Figure 13.Clinical photograph demonstrating posterior sag of the left knee.

Quadriceps active test(clinical photo)(figure 14) 

Test works by contractions of quadriceps being transmitted to the tibial tubercle via the patellar tendon. Performed by fixing foot and asking patient to try to extend the leg. If there is posterior sag the quadriceps will pull the tibia forward.

Clinical knee 14.png

 Figure 14.Clinical photograph demonstrating quadriceps active test .

Anterior/posterior drawer (clinical photo) (fig 15)

Knees flexed to 90° and feet fixed to couch. Not usually necessary to sit directly on feet. Ensure hamstrings are relaxed. Both hands grasp the upper tibia with thumbs on tibial tubercles looking for excessive anterior or posterior movement

Clinical knee 15.png

Figure 15. Anterior and posterior drawer tests.


Lachman test (fig 16,17)

Most reliable test for ACL instability.

Clinical photo demonstrating Lachman test 

Grasp the distal femur with one hand while the knee is flexed to 20° and the other hand grasping the proximal tibia trying to displace it anteriorly. Note the presence or absence of an endpoint the latter indicative of a complete rupture.

In large thighs or examiners with small hands, it is better to fix the femur over the examiner’s flexed knee but ensure the knee is under the thigh and not the knee itself.

 Clinical knee 16.png

Clinical knee 17.png

Figures 16 and 17.Lachman test


Pivot Shift Test 

  • Recreates anterolateral subluxation of the tibia on the femur measuring the rotational component of ACL function.
  • Requires an intact medial collateral ligament to maintain the medial pivot.
  • Maintain patient’s confidence if performing test in clinical situation.
  • More commonly performed under anaesthesia.

 Clinical photograph demonstrating Pivot Shift Test  (fig 18)

Patient’s leg is held in extension and the lower leg internally rotated whilst a valgus strain applied to the knee via laterally placed hand. The knee is gently flexed and at about 20° the tibia suddenly reduces from an earlier subluxed position. This happens as the ITB action shifts from an extensor to flexor.

 Clinical knee 18.png

Figure 18. Pivot shift test 


MCL injuries result in the commonest form of knee instability.

LCL instability in isolation is less common than MCL and often associated with posterolateral instability.

Greater laxity in lateral structures so therefore always compare to normal limb.

Clinical photographs demonstrating tests for MCL/LCL(Fig 19-21)

A valgus or varus force is applied to the knee in both full extension and 20° of flexion. 

Assessment of a soft or hard endpoint and the degree of opening is made.

Secondary stabilizers (cruciate ligaments or posterior capsule) are relaxed at 20° isolating the collateral ligaments. If laxity is noted in full extension as well as 20° then this would signify a major disruption of the knee in addition to the collateral ligament injury.

Clinical knee 19.png

Figure 19.Valgus force applied in full extension

Clinical knee 20.png

Figiure 20.Figure 19.Valgus force applied in 20° of flexion

Clinical knee 21.png

Figure  21.Testing colaterals.Varus force applied 

In the case of a large knee (Fig 22), the foot can be tucked in the axilla and knee cupped in both hands to apply valgus or varus stress.

Clinical knee 22.png

Figure 22.Co-lateral ligament testing in a large knee


Posterolateral corner (PLC) injuries can be isolated but more commonly are associated with PCL and ACL injuries.

 External rotation recurvatum test (Fig 23&24)

  • Posterolateral drawer sign: Posterior drawer test is performed with the tibia internally rotated and then externally rotated. An increase in magnitude indicates a PLC injury
  • Dial test (Fig 25 & 26)

 Clinical photographs demonstrating external rotation recurvatum test 

Lift both legs off the couch by grasping the great toes. A positive result is when the knee goes into varus and hyperextension (recurvatum) and externally rotates (Fig 23 & 24).

Clinical knee 23.png

Figure 23.External rotation recurvatum test

Clinical knee 24.png

Figure 24.External rotation recurvatum test

Clinical photographs demonstrating the dial test

The patient is prone and knees are together to prevent rotation at the hips.

Better control of rotation of the tibia is maintained by grasping above the ankles. 

Passive external rotation of the tibia (relative to the femur), with the knee at 30° (Fig 24) and then at 90° (Fig 25) is measured. 

The feet indicate the angle of rotation from neutral. 

Clinical knee 25.png

Figure 25.Dial test

 Clinical knee 26.png

Figure 26.Dial test

Diagnosis of meniscal injuries are usually made from the history and clinical findings of joint line tenderness. Meniscal provocation tests can be painful and probably not in the patient’s best interest.

McMurray test (Fig 27 & 28) is used to recreate displacement of the meniscal tear.

Clinical photograph demonstrating McMurray Test 

The patient’s knee and hip are flexed to 90°.The examiner's thumb and fingers of one hand should be placed over the joint line, the other hand holding the foot 

Medial meniscus- Flex the knee and then extend it   with the foot in external rotation,  the posteromedial joint is felt for a click (Fig 27)

Lateral meniscus-  Repeat the above with the foot now in internal rotation and the posterolateral joint is felt for a click (Fig 28). 

Clinical knee 27.png

Figure 27.Testing medial meniscus

 Clinical knee 28.png

Figure 28.Testing lateral meniscus 

Common pathology includes maltracking, pain, subluxation or dislocation and osteoarthritis.

Overall alignment and foot position has been mentioned earlier.  

Assessment for ligament laxity should also be performed by Beighton’s  Score. 

Patella instability tests include:

  • Patellar glide test
  • Patellar apprehension test

 Patellar Glide Test

With the knee slightly flexed the patella is moved maximally medially and then laterally (Fig 29). One imagines the patella split into quadrants, the patella should be able to be moved at least one quadrant medially; any less indicates lateral retinacular tightness.

The medial retinaculum is naturally more lax and any lateral subluxation more than two quadrants indicates laxity.

With the patella held in this lateral position, the knee is now flexed and the patient’s reaction observed (Fig 30). A positive patellar apprehension testis seen when the patient resists further flexion in fear of the patella dislocating.

Clinical knee 29.png

Figure 29.Patella glide test

Clinical knee 30.png

Figure 30. Patella glide test 

Clarke’s test is used to demonstrate patellofemoral pathology such as chondromalacia and arthritis 

A hand is placed over the suprapatellar pouch and gentle pressure applied on the superior pole of the patella. The patient is asked to attempt a straight leg raise and in doing so contracts the quadriceps which causes pain if positive (Fig 31).

Clinical knee 31.png

Figure 31.Clarke's test

Previous
Next