TOPIC DETAILS

  Team Member Role(s) Profile
Fazal Ali Fazal Ali Section Editor
Karen Robinson Karen Robinson Segment Author

 Section editor: Mr Fazal Ali

Segment author: Mrs Karen Robinson

Document history:

General Questions

 Past Medical History

  • Diabetes
  • Gout
  • PVD
  • Rheumatoid Arthritis
  • Spinal pathology

Duration of symptoms

Previous treatment

Previous surgery

Use of insoles

Walking aids

How long can you walk for? 

Family History

  • Neuromuscular (CMT) 
History

Pain

  • Site, forefoot/midfoot/hindfoot?
  • Onset
  • Character
  • Radiation
  • Associated activities
  • Timing
  • Exacerbating or relieving features 

Deformity

  • Sudden or progressive?
  • Symmetrical / asymmetrical?
  • Forefoot/midfoot/hindfoot?

 Swelling

  • Sudden or progressive?
  • Activity related?
  • Site, over joint or tendon?

 Stiffness

  • Time of day, OA/RA?

Instability

  • Recurrent sprains
  • Difficulty with uneven ground or high heels

General 

Patients should have the whole of the lower limb below the knee visible.

Inspect the back for any spinal pathology

Inspect the hands for wasting e.g. in Charcot Marie Tooth

Carry out Beighton’s score to confirm hyperlaxity if required e.g. patients with pes planus

 Standing 

Foot and ankle pathology can be easily missed with the patient sitting down, therefore it is imperative to stand the patient 

Look from the:

  • Front

-     Scars

-     Deformities e.g. hallux valgus/rigidus/varus, claw/hammer/mallet toes

-     Skin changes

-     Nail changes

-     Ankle swelling 

  • Side

-     Medial arch, high (cavus) or flat (planus) 

  • Back

-     Tibiocalcaneal angle (normal is ~ 5°valgus), varus or valgus

-     Swelling of tendoachilles, posteromedial or posterolateral tendons

-     ‘Too many toes sign’, more than 1.5 toes visible indicates a pes planus deformity

Calf size and asymmetry e.g. in CTEV 


Clinical ankle 1.png

 Figure 1.Clinical photograph showing normal tibiocalcaneal angle and hindfoot alignment 

Walking

Gait Pattern

  • Foot progression angle
  • Antalgic
  • Stiffness
  • Speed
  • Rockers

-     Rocker 1, heel strike

-     Rocker 2, tibial transfer

-     Rocker 3, toe off

Rocker 1

Heel strike, the heel should be the first part of the foot to touch the ground and requires adequate ankle dorsiflexion

Clinical ankle 2.png

Figure 2.Rocker 1.Heel strike 

Rocker 2

During stance phase there is weight transfer posteriorly to anteriorly over the foot, and the ankle dorsiflexes

Clinical ankle 3.png

Figure 3.Rocker 2 tibial transfer

Rocker 3

Toe off, the great toe is the last part of the foot to leave the floor. Adequate dorsiflexion of the 1st MTPJ and plantar flexion of the ankle is needed for propulsion

Clinical ankle 4.png

Figure 4.Rocker 3.Toe off

This test is used to detect if the cavovarus deformity is a fixed hindfoot deformity, or flexible hindfoot deformity driven by the forefoot. The pressure is removed from the 1stmetatarsal as the great toe is off the block. If the varus position is driven by the forefoot, the hindfoot will correct into valgus. If the deformity is fixed in the hindfoot the position will remain in varus.

Stand the patient with their heel on the block and the first ray off the block. This allows the pressure to be removed from the first metatarsal. Observe the hindfoot from behind.

Clinical ankle 5.png

Figure 5.Coleman's block test

This test is used to assess a planovalgus deformity. In a flexible deformity the hindfoot valgus will correct. The heel swings into varus and the medial arch is recreated. With a fixed deformity the hindfoot remains in varus.

Ask the patient to stand close to the wall and rise up onto their tip toes.Patients can cheat by moving away from the wall and leaning forwards. By asking them to stand close to the wall this maneuver is eliminated and the test is more reliable. A single leg tip toe test can be performed. Here the patient will not be able to achieve this  in the presence of a tibialis posterior tendon rupture

Clinical ankle 6.png

Figure 6.Tip toe test 

Highlights asymmetry of ankle dorsiflexion

Clinical ankle 7.png

Figure 8.Clinical photograph showing equal bilateral ankle dorsiflexion 

Inspection

Sitting

Position the patient so that the foot can easily be inspected. 

Look for:

  • Insoles
  • Shoe wear pattern
  • Walking aids
  • Sole of the foot for callosities or ulcers
  • Between the toes
  • Any other scars

Clinical ankle 8.png

Figure 8.Photograph showing insoles inside the shoe 

Ascertain if the patient has any pain prior to palpation

Palpate in a systematic manner proximal to distal or distal to proximal depending on the focus of the examination. 

Be specific and relate findings to the anatomy being palpated.

Include a neurovascular assessment

Ankle motion (20°- 40°)

Examination of the ankle joint

Best examined with the knee flexed. Hold the calcaneus with one hand, invert the foot to lock the subtalar joint. Rest the foot on the forearm and place the other hand on the tibia. Dorsiflex the ankle by lifting the forearm that supports the foot.
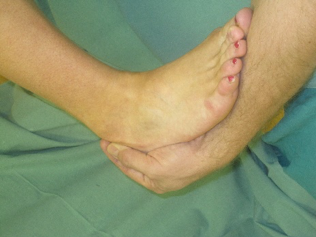
Clinical ankle 9.png

 Figure 9.Clinical photograph showing ankle movement 

Subtalar motion (5°valgus, 5°varus)

Isolated subtalar joint motion is subtle. The ankle should be dorsiflexed to lock the talus and isolate the subtalar joint.

Examination of the subtalar joint

Place one hand on the tibia with a finger and thumb gently feeling the talar head. Place one hand holding the calcaneum with the foot on the forearm. Dorsiflex the ankle. Apply a varus/valgus stress and stop when the talus is felt to move. 
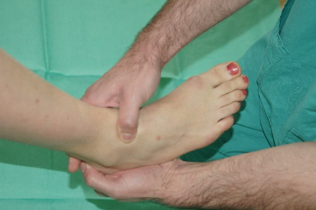
Clinical ankle 10.png

Figure 10.Range of movement subtalar joint

Inversion and Eversion (~ 20° inversion and 10° eversion)

Combined movement of the subtalar joint, chopart’s joint and midtarsal joints

Examination of Inversion and Eversion

Examine inversion in plantarflexion and eversion in neutral 

Chopart’s joint 

The calcaneocuboid joint and talonavicular joint make up Chopart’s joint.

Pronation/supination movement

Examination of Chopart’s joint

Hold the hindfoot stable in neutral with one hand, with the other hand hold the midfoot, passively supinate and pronate through Chopart’s joint.
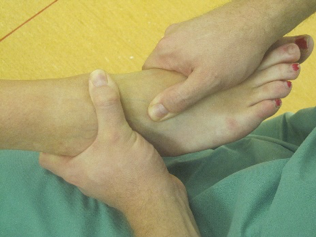
Clinical ankle 11.png

Figure 11.Range of movement of Chopart's joint 

Midtarsal joints

Adduction and abduction 

Examination of The midtarsal joints

Hold the hindfoot in a neutral position with one hand, hold the foot with the other hand and assess passive abduction and adduction.

First Tarsometatarsal joint

Looking for excess superior and inferior translation

Examination of the First Tarsometatarsal joint

Fix the midfoot with one hand, grasp the first metatarsal with the other hand. Passively displace the first metatarsal in a dorsal/plantar direction 

First MTPJ

  • Plantarflexion
  • Dorsiflexion
  • Varus/valgus alignment
  • Grind test 

Examination of the First Metatarsal Phalangeal joint.

Hold the 1stmetatarsal with one hand and hold the proximal phalanx with the other hand. Assess the joint for varus/valgus correction and dorsiflexion and plantar flexion.
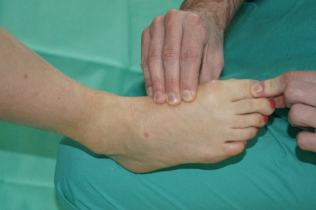
Clinical ankle 12.png

Figure 12.Range of movement of 1st MTP joint

Hold the 1stmetatarsal in one hand and the proximal phalanx in the other hand. Apply a longitudinal pressure across the 1stMTPJ and rotate the toe. This will elicit pain from an arthritic joint.

Testing of the gastrocnemius and soleus complex.

Passive plantarflexion of the ankle as the knee is extended indicates a tight gastrocnemius.

no change in ankle dorsiflexion as the knee is extended indicates a tight gastrosoleus complex.

Place one hand on the knee and one hand holding the hindfoot with the foot resting on the forearm. Flex the knee and bring the foot into maximum dorsiflexion. Passively extend the knee, look feel for ankle plantarflexion at the same time.

Palpate the tendon  

  • Tibialis Posterior

Plantarflexion and resisted inversion

  • Tibialis Anterior

Dorsiflexion and inversion, resisted plantarflexion

  • Peroneus Longus

Plantarflexion and resisted eversion

  • Peroneus Brevis

Neutral and resisted eversion

Strong: Tibialis Posterior

            Peroneus Longus 

Weak: Tibialis Anterior

           Peroneus Brevis

Place the foot in plantarflexion and inversion. Ask the patient to maintain the position and attempt to push the foot into eversion. Feel the Tibialis Posterior tendon at the same time with the other hand. 

Clinical ankle 13.png

Figure 13.Testing tibialis posterior muscle strength

Place the foot in maximum dorsiflexion and inversion.  Ask the patient to maintain the position and attempt to plantarflex the ankle. Feel the Tibialis Anterior tendon at the same time.

Clinical ankle 14.png

Figure 14.Testing tibialis anterior muscle strength

Place the foot into maximum neutral and eversion. Ask the patient to maintain the position and attempt to push the foot into inversion.

Clinical ankle 15.png

Figure 15.Testing tibialis peroneus brevis muscle strength

  • Fixed or flexible deformity

Lesser toe deformity

Extend the lesser toes MTPJs to relax the long flexors. Assess the flexibility of the PIPJ deformity in this position.

Assessment of the anterior talofibular ligament. 

Look for:

  • Sulcus sign

Feel for:

  • End point

Compare:

  • Anterior translation between the two sides

Anterior Drawer

Grasp the heel with one hand and hold the lower tibia with the other hand. Pull forward on the heel (aiming to pull the heel in the direction of the examiners shoulder) and push back against the tibia.

Clinical ankle 16.png

Figure 16.Anterior Drawer test

Previous
Next